Contents
- 1. Why Exercise is Crucial for Sciatica?
- 2. Effective Sciatica Exercises at Home
- 2.1. Lying Knee-to-Chest (Improving Lumbar Flexibility)
- 2.2. Standing Hamstring Stretch (Relieving Nerve Compression)
- 2.3. Spinal Stretch Exercise (Relieving Lower Back and Leg Pain)
- 2.4. Piriformis Muscle Stretch (Figure-4 Stretch)
- 2.5. Pelvic Tilt (Core Stability)
- 2.6. Seated Sciatic Nerve Glide (Nerve Flossing)
- 2.7. Seated Spinal Twist
- 2.8. Supine Hamstring Stretch (With Towel/Strap)
- 2.9. Child’s Pose (Lower Back & Erector Spinae Stretch)
- 2.10. The Plank (Core Stabilization)
- 2.11. Full Cobra Stretch (Prone Press-Up)
- 2.12. Cat-Camel Stretch (Cat Pose)
- 2.13. Sphinx Pose (Prone on Elbows)
- 2.14. Glute Bridge Strengthens
- 2.15. Quadruped Leg Extension (Bird Dog Prep)
- 2.16. The Bird Dog (Advanced Spinal Stabilization)
- 2.17. The Superman Strengthens
- 2.18. Classic Pigeon Pose
- 3. Important Guidelines for Safe Practice
- 4. Frequently Asked Questions (FAQ)
To achieve the best recovery results, ACC doctors recommend combining your professional treatment plan with specific home exercises. Below are 4 simple, safe, and effective exercises designed to relieve sciatica pain.
1. Why Exercise is Crucial for Sciatica?
Sciatica is often a warning sign of underlying spinal issues, such as a herniated disc. While commonly associated with aging, it increasingly affects younger individuals due to heavy lifting or improper posture. If left untreated, sciatica can severely limit daily mobility, lead to muscle atrophy, and significantly impact your quality of life.

Complementing Your Treatment: The Importance of Daily Exercise Beyond strictly following your treatment plan, establishing a suitable daily exercise regimen is a key factor in managing pain and actively supporting your recovery process.
Benefits of Sciatica Exercises. Specifically, a consistent routine offers the following benefits:
- Alleviates Acute Pain: Helps reduce the intensity of sciatic nerve pain.
- Builds Strength & Flexibility: Enhances power and range of motion in the back, lumbar region, hips, and hamstrings.
- Boosts Circulation: Increases blood flow to the spine, nourishing muscles and nerves while promoting soft tissue healing and reducing stiffness.
- Reduces Nerve Tension: Mobilizes the sciatic nerve and effectively reduces local swelling.
- Restores Mobility: Improves overall body movement and function.
- Prevents Recurrence: Minimizes the risk of future sciatic nerve pain flare-ups.
2. Effective Sciatica Exercises at Home
The following exercises are designed to relieve pain and support your treatment progress. Important: Always consult your ACC doctor before starting any new exercise routine to ensure it is safe for your specific condition.
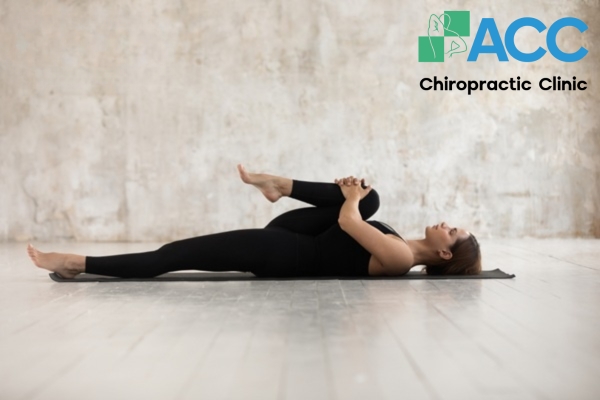
2.1. Lying Knee-to-Chest (Improving Lumbar Flexibility)
Consistent practice of this movement helps release lower back tension.
- Starting Position: Lie flat on a mat or rug. You may place a small pillow or book under your head for support. Bend both knees with feet flat on the floor, hip-width apart. Relax your upper body and gently tuck your chin toward your chest.
- Execution: Lift one knee toward your chest and clasp your hands around it. Gently pull the knee closer to your chest until you feel a comfortable stretch. Hold for 20-30 seconds, breathing deeply.
- Repetition: Switch legs and repeat 3 times per side.
- Notes:
- Keep your shoulders relaxed
- Avoid overstretching or straining your neck.
2.2. Standing Hamstring Stretch (Relieving Nerve Compression)
This exercise targets the muscles often responsible for compressing the sciatic nerve.
- Starting position: Stand upright and place one foot on a stable surface, such as a step or stair. Keep the leg straight and flex the toes upward.
- Execution: Lean your body forward while keeping your back straight. Hold the position for 20–30 seconds and breathe deeply. Switch legs and repeat 2–3 times.
- Notes:
- Do not overstretch or force the movement.
- Keep your back straight throughout all positions.
>> Read more: Foot Treatment
2.3. Spinal Stretch Exercise (Relieving Lower Back and Leg Pain)
- Starting position: Sit upright with your back straight and legs extended forward. Keep your eyes looking straight ahead.
- Execution: Slowly lift one knee toward your chest, then use both hands to gently pull the knee closer to the chest while breathing deeply. Hold for about 10 seconds, then release the leg back to the starting position and breathe normally. Switch sides and repeat.
- Notes:
- Keep your back straight during the exercise.
- Perform all movements gently.
2.4. Piriformis Muscle Stretch (Figure-4 Stretch)
This exercise targets the deep buttock muscle that often irritates the sciatic nerve.
- Starting Position: Lie on your back with a small pillow supporting your head. Bend your left knee with your foot flat on the floor. Cross your right ankle over your left knee (creating a “figure 4” shape).
- Execution: Thread your hands through your legs to grasp the back of your left thigh. Gently pull the left leg toward your chest until you feel a deep stretch in your right glute/buttock. Keep your tailbone flat on the floor and hips square. Hold for 20-30 seconds while breathing deeply.
- Repetition: Switch legs and repeat 2-3 times.
- Notes:
- If you cannot reach your thigh, loop a towel around it and pull gently.
- Avoid lifting your hips/tailbone off the floor to ensure the stretch targets the correct muscle.
2.5. Pelvic Tilt (Core Stability)
A gentle movement to strengthen the lower abs and support the lumbar spine.
- Starting Position: Lie on your back on a firm surface (mat). Bend both knees, keeping feet flat on the floor and hip-width apart. Place your arms by your sides.
- Execution: Exhale firmly, tighten your abdominal muscles, and press your lower back flat against the floor (eliminating the arch in your lower back). Hold this “imprint” position for 5 seconds while breathing evenly, then inhale and relax to the starting position.
- Notes:
- You can place your hands on your hip bones to feel the muscles contracting.
- Focus on the movement coming from your abs/pelvis, not by pushing with your legs.
2.6. Seated Sciatic Nerve Glide (Nerve Flossing)
This exercise helps the nerve “glide” smoothly through tissues, reducing stiffness and sensitivity. Perform gently.
- Starting Position: Sit upright on a chair with your knees bent at a 90-degree angle and feet flat on the floor.
- Execution: This is a coordinated movement:
- Inhale: Slowly straighten one leg forward (foot flexed) while simultaneously looking up toward the ceiling.
- Exhale: Slowly lower the leg (bending the knee) while simultaneously tucking your chin toward your chest (slumping slightly is okay here).
- Repetition: Repeat this fluid motion 10 times. Perform 1-2 times a day.
- Notes:
- Crucial: Do not hold the stretch. Keep the movement fluid.
- If you feel sharp pain or numbness, stop immediately. You should only feel a gentle tension, not pain.
- If symptoms worsen, reduce the range of motion (don’t straighten the leg fully).
2.7. Seated Spinal Twist
This exercise helps improve spinal rotation and releases tension in the lower back.
- Starting Position: Sit on the floor with both legs extended straight in front of you.
- Execution: Bend your right knee and cross your right foot over your left leg, placing it flat on the floor. Rotate your torso toward the right knee. Place your right hand on the floor behind you for support and use your left arm to gently hug your right knee. Hold for 10-15 seconds, then slowly return to the center.
- Repetition: Switch sides and repeat.
- Notes:
- Keep your spine tall and straight while twisting.
- Do not slouch. Look over your back shoulder to deepen the stretch if comfortable.
2.8. Supine Hamstring Stretch (With Towel/Strap)
Using a towel makes this exercise safer for your back compared to standing stretches.
- Starting Position: Lie on your back with both legs extended. Hold a long towel, belt, or resistance band in your hands.
- Execution: Loop the towel around the sole of one foot. Keeping the other leg flat on the floor, slowly lift the towel-wrapped leg straight up toward the ceiling. Pull gently until you feel a comfortable stretch in the back of the thigh (hamstring). Keep the knee straight but not “locked.” Hold for 20-30 seconds.
- Repetition: Lower the leg and switch sides. Repeat 2-3 times per leg.
2.9. Child’s Pose (Lower Back & Erector Spinae Stretch)
A gentle yoga pose that elongates the spine and relaxes the back muscles.
- Starting Position: Start on your hands and knees. Your knees should be hip-width apart and your hands directly under your shoulders.
- Execution: Slowly push your hips backward until your buttocks touch your heels. Simultaneously, slide your arms forward along the floor, lowering your chest toward the mat. Let your forehead rest on the floor. Hold for 10-20 seconds while breathing deeply.
- Note:
- Feel the stretch along your spine.
- If your hips don’t touch your heels, that’s okay—go as far as is comfortable.
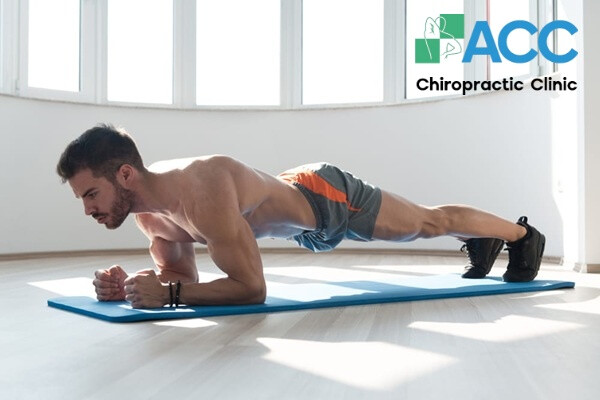
2.10. The Plank (Core Stabilization)
Strengthening the core is essential to support the spine and reduce pressure on the sciatic nerve.
- Starting Position: Lie face down. Place your elbows directly under your shoulders, forearms resting on the floor.
- Execution: Engage your abs and lift your hips off the floor, balancing on your forearms and toes. Your body should form a straight line from head to heels.
- Duration: Hold for 20-30 seconds (or as long as you can maintain good form).
- Stop Immediately If:
- Your lower back starts to sag or arch.
- You feel sharp pain in your lower back.
- Your body begins to shake uncontrollably.
- Note:
- Keep your neck neutral (look at the floor, not up or down).
- Breathe evenly; do not hold your breath.
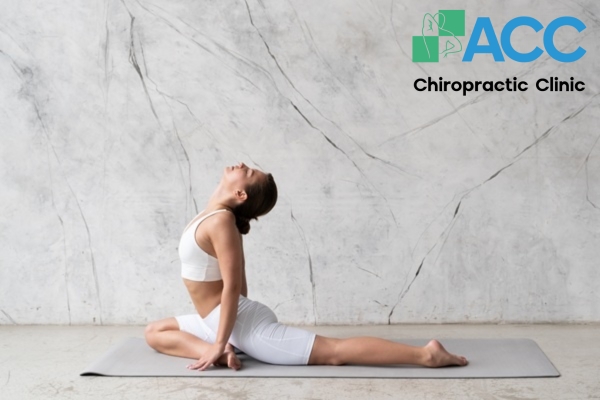
2.11. Full Cobra Stretch (Prone Press-Up)
This exercise helps extend the lumbar spine, reversing the hunched posture we often adopt during the day.
- Starting Position: Lie face down on a mat. Place your palms flat on the floor directly under your shoulders, elbows tucked close to your body.
- Execution: Slowly straighten your arms to lift your chest off the floor. Keep your hips and pelvis grounded. You should feel a gentle stretch in your abdomen and lower back. Hold for 10 seconds, then slowly lower yourself back down.
- Notes:
- If you feel a pinching pain in your lower back, stop and switch to the gentler “Sphinx Pose” (Exercise 2.13).
- Keep your shoulders down, away from your ears.
2.12. Cat-Camel Stretch (Cat Pose)
A classic mobility exercise to loosen stiffness in the entire spine.
- Starting Position: Start on your hands and knees (tabletop position). Knees should be hip-width apart and hands directly under your shoulders.
- Tip: Spread your fingers wide to distribute your weight evenly and reduce pressure on your wrists.
- Execution:
- Exhale: Gently tuck your chin toward your chest and round your back up toward the ceiling (like an angry cat). Pull your belly button toward your spine.
- Hold: Stay in this rounded position for 5 seconds (or 5 breaths).
- Inhale: Slowly return to a neutral, flat back position.
- Note: Move smoothly; avoid jerking your spine.
2.13. Sphinx Pose (Prone on Elbows)
A gentler version of the Cobra Stretch, ideal for beginners or those with significant back stiffness.
- Starting Position: Lie face down on the floor with legs extended straight behind you.
- Execution: Prop your upper body up on your forearms. Your elbows should be directly underneath your shoulders (forming a 90-degree angle). Press your forearms into the floor to lift your chest. Look straight ahead and feel a mild compression in the lower back. Hold for 15-30 seconds.
- Notes:
- Relax your glutes and legs
- Let your lower back do the passive work.
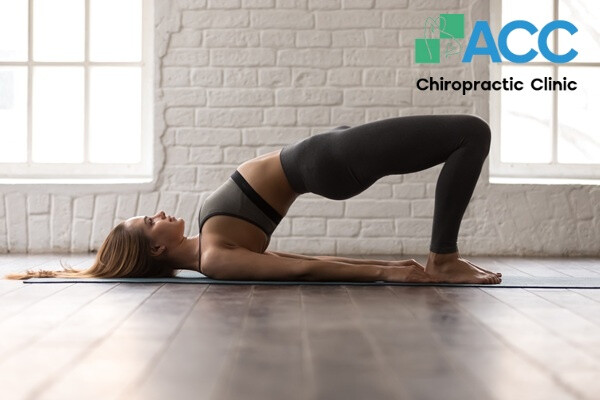
2.14. Glute Bridge Strengthens
The glutes and hamstrings, which support the lower back and reduce sciatic pain.
- Starting Position: Lie on your back with knees bent and feet flat on the floor, hip-width apart. Place your arms by your sides, palms facing down.
- Execution: Squeeze your glutes (buttock muscles) and lift your hips off the floor until your knees, hips, and shoulders form a straight line. Do not over-arch your back. Hold for 10 seconds at the top, then slowly lower your hips.
- Notes:
- Focus on lifting with your hips, not by pushing with your lower back.
- Keep your weight balanced on your shoulders and feet, not your neck.
2.15. Quadruped Leg Extension (Bird Dog Prep)
A foundational stability exercise that isolates the glutes and lower back muscles.
- Starting Position: Start on your hands and knees (Tabletop position). Ensure your hands are directly under your shoulders, and your knees are under your hips. Keep your back flat like a table.
- Correction Note: Your original text said “Lying face down,” but described a kneeling posture. I have corrected this to the standard “Hands and Knees” position.
- Execution: Tighten your core (pull belly button to spine). Slowly extend your left leg straight back until it is parallel to the floor. Do not arch your back or rotate your hips. Hold for 3-5 seconds, then lower the leg.
- Repetition: Switch to the right leg. Repeat 5-10 times per side.
2.16. The Bird Dog (Advanced Spinal Stabilization)
This progresses the previous exercise by adding arm movement, challenging your balance, and deep core muscles.
- Starting Position: Start on your hands and knees, keeping your spine neutral and looking down at the floor to protect your neck.
- Execution: Simultaneously raise your left arm forward and extend your right leg back. Imagine a straight line running from your fingertips to your heel.
- Hold: Balance for 5-10 seconds without letting your hips wobble.
- Return: Slowly return to the starting position.
- Repetition: Switch to the opposite pair (Right Arm + Left Leg).
2.17. The Superman Strengthens
The entire posterior chain (back, glutes, and hamstrings).
- Starting Position: Lie face down on the floor with your legs straight and arms extended in front of you (like Superman flying).
- Execution: Engage your glutes and lower back muscles to simultaneously lift your arms, chest, and legs off the floor. Your weight should be balanced on your pelvis and lower stomach.
- Correction: It is impossible to keep the stomach off the floor as originally written; the goal is to lift the chest and thighs.
- Duration: Hold for 3-5 seconds (start short to protect your back), then slowly lower back down.
- Note: If this causes any pinching in the lower back, skip this exercise.
2.18. Classic Pigeon Pose
A deep stretch for the hips and glutes, excellent for releasing tension caused by sciatica.
- Starting Position: Start on your hands and knees.
- Execution:
- Slide your right knee forward toward your right wrist. Angle your right shin so your foot moves toward your left wrist (it’s okay if the foot is close to the groin).
- Slide your left leg straight back, lowering your hips toward the floor.
- Deepen: If comfortable, walk your hands forward and lower your chest toward your thigh.
- Duration: Hold for 15-30 seconds while breathing deeply.
- Repetition: Carefully switch legs and repeat on the other side.
- Note: If your hip is very tight and doesn’t touch the floor, place a rolled towel or cushion under your right hip for support.
3. Important Guidelines for Safe Practice
To maximize benefits and prevent injury while performing these exercises, please observe the following rules:
- Warm-Up is Mandatory: Never stretch “cold” muscles. Spend 5-10 minutes walking gently or doing light joint rotations to increase blood flow and loosen stiff joints before starting.
- Prioritize Form & Breathing: Focus on the quality of the movement, not the quantity. Coordinate your movement with deep, rhythmic breathing. Never hold your breath.
- Listen to Your Body: Everyone’s pain threshold and range of motion are different. Start with low intensity and short duration. Do not force your body into positions that feel sharp or painful.
- The “Stop” Signal: If you experience sharp shooting pain, numbness, or dizziness, stop immediately. Resting is better than aggravating the nerve. If pain persists, contact your ACC doctor.
- Environment & Gear: Wear comfortable, stretchy clothing that allows for a full range of motion. Choose a flat, non-slip surface (like a yoga mat) in a well-ventilated area.
4. Frequently Asked Questions (FAQ)
4.1. How long should I practice these exercises?
- Correction: Unlike standard gym workouts, rehabilitation should not be overly long.
- Recommendation: Aim for 15 to 30 minutes per day. Consistency is more important than duration. You can even split this into two smaller sessions (15 minutes in the morning to relieve stiffness, and 15 minutes in the evening to relax before bed). Avoid exercising for too long (e.g., over an hour), as muscle fatigue can lead to poor form and injury.
4.2. How long should I warm up?
Experts recommend a 5 to 10-minute warm-up. This is sufficient to raise your body temperature and prepare the nervous system. Start gently; avoid high-impact jumping or fast twisting during warm-ups.
4.3. What other sports are safe for sciatica patients?
In addition to specific rehab exercises, low-impact activities are highly beneficial for recovery:
- Walking: Keeps the spine mobile (avoid walking on uneven terrain).
- Swimming / Water Aerobics: The buoyancy of water reduces stress on the spine.
- Cycling: Stationary bikes (recumbent bikes) are often safer than outdoor cycling as they provide back support and reduce shock.
- Avoid: High-impact sports like running, soccer, tennis, or weightlifting until approved by your doctor.
>> More information: What is sport injury?

Why Choose ACC?
- Chiropractic Adjustment: Realigns the spine to relieve pressure on the sciatic nerve naturally.
- Advanced Physical Therapy: We utilize state-of-the-art technology (such as DTS Decompression and Class IV Laser) to speed up tissue healing.
- Personalized Rehabilitation: Unlike generic routines, our specialists design a custom exercise plan tailored to your specific condition, strengthening the exact muscles needed to stabilize your spine and prevent recurrence.
Start Your Journey to a Pain-Free Life. Don’t let sciatica control your daily activities. Contact ACC today to schedule a consultation with our foreign experts and build a safe, effective treatment plan just for you.
>> Read more: